Raising Rotifers or Copepods...The Method is the Same
Last updated: April 2011
Written by Amie H., 2008
Introduction
Simplified Version Explained
From the Beginning…What you need
Getting Set Up
Introduction
Hi, my name is Amie and I have raised rotifers and copepods for over 6 years now. The method used is fairly common for raising copepods (with a few exceptions),but certainly not as common for raising rotifers. I have had plenty of people question me about raising rotifers this way instead of the more common way - in a glass aquarium with lights and a heater. The reason I have adopted this method is pretty simple, it works, it is low-maintenance and I haven’t had a rotifer crash for years. I can’t count the number of cultures I lost using the common method of raising rotifers. Not only is it expensive to lose a culture but very frustrating to start over. If you are going to use this method, it is important that you follow the instructions closely, if you embellish or leave a step out, it doesn’t work. Do not make this harder than it is. It is really, really easy!
I hesitate to use the term tigger-pod™ in this article because that is a copyright name given to the copepod Tigriopus californicus by Reed Mariculture. However, when I mention copepods or pods, I am speaking of the T. californicus species, for the most part. I cannot guarantee that this method will work on other copepods, however, I have raised several different harpacticoid copepods similar to the tigriopus californicus using this method and have not had any issues raising them.
Simplified Version Explained
I consider the method in this document to be quite simple, but I have explained it to countless people and they usually come back with questions, hence the reason why this document is so large. I still feel that the simple explanation is the best, at least to start with. Then, if you have specific questions, go to that section in the document and read a more detailed explanation.
There are 4 main things that you will need:
1) your starter culture (rotifers or copepods),a clean bucket, a 5-gallon is good if you want a large culture,
2) new saltwater mixed to around 1.019,
3) glycerin-free phytopaste, and
4) an air pump with a rigid tube at the end of the tubing.
Fill your bucket up about 1⁄4 the way to the top with the salt water, add the starter culture to the water, place the rigid airline down into the water, start the air pump and adjust the bubbles to about 2 bubbles per second. Now add several drops of phytopaste, based on the amount of water you have in your bucket and stir the water gently with the rigid tubing that is in the water. You want the water to be tinted green, but not so dark that you can no longer see the bubbles from the airline moving in the water. That’s it for set up. Use a flashlight to watch the pods/rotifers to see if they are multiplying in the bucket – rotifers look like dust particles in the beam of the flashlight and copepods are easily seen along the edges of the bucket.
Do not disturb the newly set up bucket for several days. If you are working with rotifers, you will not see a big jump in population for about a week. If you are working with copepods, it could be 2-4 weeks before you notice a major population explosion. Just keep an eye on the bucket every few days, making sure the water is still a light green. If it starts to clear, add several more drops of phytopaste and gently stir the water with the rigid airline that is already in the water.
Once you see a lot of pods/rotifers in the water, it is either time to harvest or add more salt water to the bucket. Adding water to the bucket reduces the ammonia level in the bucket and increases the space available for the culture to grow. The reason you don’t fill the entire bucket up at the beginning is so you can get a good concentration of phytopaste for the start culture without having to put too much of the paste in the bucket to begin with. It is more practical to start with less water, plus, you will be able to reduce the number of water changes needed since adding new water will improve the water quality drastically. The first time I add water, I usually only double the amount of water, leaving about ½ of the bucket available for future water additions. Add more food, stir the water and check the bubble rate again. Continue this process every 4-5 few days until your bucket is full of water and pods.
That’s if for getting your culture going, the quick and simple version. Now, I’m going to start all over, but expand on all of the topics that I just skimmed over.
From the Beginning…What you need
1) 5+ gallon dark colored bucket. A white bucket will work but they will grow at a significantly slower rate.
2) A small air pump, an airline hose, an adjustable flow air valve and about 8-12” of rigid airline tubing. (The reason I use a piece of rigid tubing at the end of the airline is for convenience. Sometimes it is necessary to clean the tubing and it is a lot easier to clean the rigid tubing than it is the airline. Plus, you will need something to stir the phytopaste with when you add it to the bucket – the rigid tubing comes in handy for this.)
3) Newly mixed salt water at 1.019-1.020ish. Actually, I have talked to a couple of people and they are finding that tank water, after a water change, is working just fine .. but I’m still using new SW.
4) Glycerin-free Nannochloropsis phytopaste. Why glycerin-free? Glycerin is a cryo-preservative that is added to most algae pastes that you buy on the market. Adding the glycerin will prevent the paste from freezing during storage. I have used several different types of phytopaste and when I first receive a new paste, I always do 2 things:
a) look under the microscope for live cells, and
b) try to grow a culture of phytoplankton from the paste. With glycerin-free paste, I have always found live phytoplankton under the microscope and I have always been able to start a culture of live phytoplankton from it. With glycerin phytopaste, I sometimes see a few live cells of phytoplankton, but significantly less than with the glycerin-free. I had very little success trying to start a culture with glycerin paste. The best success I had was when I was using DT’s Live Marine Phytoplankton. What does this mean? I don’t know...sorry. But, my best guess and from some research I have done on cryopreservative glycerin, the glycerin actually kills about 40-50% of the cells it comes in contact with. When I have fed a glycerin paste to my cultures, I would have to change the water more often because of high ammonia levels or contamination. I lost a lot of cultures before switching to glycerin-free paste and I’m just going to say that it’s because the paste is more ‘alive’ without the glycerin. How is that for a scientific explanation (just don’t quote me on that)?
c) Ambient Light – You will need to place the bucket in a room where there is light in the room for about 12 hours. It can come from another tank or whatever. You don’t want to have it directly over the bucket, though.
d) Plastic ‘ tray’ from frozen fish food – This one is strange but it works. You need one or 2 of those trays that has cubed frozen fish food when you buy frozen brine, mysis, etc. If you don’t know what I’m talking about, see the picture in the next section.
e) A 53-micron sieve if you are raising rotifers, and a 180 and 300 micron sieve for copepods. I have expanded on this subject in Appendix B at the end of this document.
f) A bright flashlight – Use this to shine down into the bucket. It is the best way to see how concentrated the culture is getting and whether new food is needed.
Getting Set Up
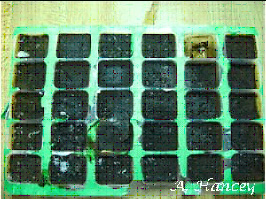
Figure 1: 'phyto-cubes'
When you buy your paste, it should be frozen. Put the bottle in the refrigerator for several hours to thaw and then pour the entire bottle into empty cube trays and put the trays in the freezer for 24 hours. Basically, you are making small phyto cubes. The reason for this is simple, if you keep the phyto bottle in your refrigerator, it will go bad in about a month, but it lasts for 3-6 months in the freezer. If you freeze it, you will have to thaw the entire bottle every time you want to use it. If, by some accident, you leave it sitting out overnight, the phyto will go rancid and kill your culture. The “phyto-cubes” are the best method I have found the save time and money.
Once frozen, you can pop them out and put them in an airtight freezer bag. If you put the entire tray in a bag instead of popping them all out at the beginning, they will be harder to take out later. Don’t ask me why, but they are easier to get out after first frozen.
Find a good location for your bucket to reside. This will be an out of the way spot that will receive light from a window or other aquarium during the day; I keep mine under a shelf. You might want to set the bucket up on a 1 foot tall pedestal if you have one - this will help when siphoning later. Also, if possible, a basement is best…the cooler the better. I have mine in an unfinished part of my basement that doesn’t have any windows so it doesn’t get heat in the summer.
Next, add 1 gallon of mixed saltwater at 1.019ish. I say ‘ish’, because I’m pretty bad at measuring. I usually make my saltwater anywhere from 1.018-1.021, but I don’t top-off that much, so I am not sure that it matters that much.
It’s never a bad idea to let your new rotifers/copepods float in the new bucket for 10 minutes to make sure there isn’t a temperature shock. (I’ve never done this, but I’m sure it’s not a bad idea.) Then, dump the critters into the bucket.
Put approximately 1 cup (250cc) of salt water in a small container, preferably one that has a lid. Take a single cube of phytopaste from the freezer, place it in the small container and let it thaw for a few minutes. Stir it well so the phytopaste mixes well with the water. If you have one gallon of salt water in your bucket, pour about ¼ of the small container of phytopaste into the bucket and stir it up with the rigid airline. You want to add enough phytopaste so you can’t see the bottom of the bucket, but not so much that it is a really dark green color. This takes a while to get used, you just don’t want to overfeed. If you get too much phytopaste in the water, water clears as they eat it and then add more. You will get the hang of it. My general rule is if I can see the bottom of the bucket when I shine the flashlight in the water, they need more food.
If you have any of the “phyto-water” left in the cup, cover it and put it in the refrigerator and save it for next time. Label the container so no one drinks it…blah.
This is a little tricky to explain. I don’t add a lot of air to the bucket. You don’t want them tossing and turning. I just let the rigid airline tubing go down a few inches into the bucket and then adjust it to bubble about 2 bubbles per second.
If you are reading this article for growing copepods, then I usually take the air completely out every few days. I will grow 2 cultures of copepods side-by-side and I’ll have one line of air. I move the airline from one bucket to the other every couple of days. I’ve found that I get a lot larger population when I do this. I have grown copepods in a 10-gallon glass tank and have noticed that the tiny copepods cling to the edges of the container. If the air is too strong, you will not see an increase in population and I think it’s related to this somehow. One of these days maybe I’ll have a better explanation. But I’ve played with it a lot and I get more from a bucket with absolutely no air than I do from one that has too much air.
Maintenance
Your culture should begin to grow once you add phytopaste. A brand new copepod culture takes about 10 days before you start to see significant growth. That is because it takes 10 days for new larvae to be released and grow large enough for you to be able to see them. So, let me rephrase all of that… do not do anything for 10 days. If you are raising rotifers, they multiply faster than copepods. You should wait 5 days before doing any maintenance on them for the first time.
Here’s your daily maintenance routine once your culture is established:
Shine a flashlight in the bucket and ask the following questions:
1. Are there too many rotifers/copepods in the water? In other words, are there so many that you say, “Wow, there are a ton in there!”
a. Yes – add another gallon of water or harvest – see Harvesting section below.
b. No – do nothing
2. Can I see the bottom of the bucket?
a. Yes – add more phyto.
b. No – do nothing.
3. Does the water smell bad or are there small bubbles forming at the top of the water’s edge? (An indication of high ammonia.)
a. Yes – Big water change – see Big Water Change section below.
b. No – do nothing.
4. Has the water level dropped?
a. Yes – Top off with RO or dechlorinated tap water.
b. No – Do nothing.
If you are having trouble deciding how much food to feed, or you are not used to the amount to give them, it’s always a good idea to scoop out a small amount of water into a clear glass. (not a plastic glass, but a ‘glass’ glass.) Hold this glass up to the light. If the water is clear or light yellow, they need food. If it is dark green, there is too much food (add another gallon of water). If it is medium green (sorry so technical), the food is just right. The color should be a nice light to medium green. Don’t worry, you will get used to it!
This part isn’t fun, but the good news is that it only needs to happen about every 2-3 months. When the water starts to smell or starts getting lots of tiny bubbles around the edge of the water surface, a water change is needed. (Another reason to change the water is if you start to notice depletion in the number of rotifers/copepods for no apparent reason. (Most likely, the ammonia level is too high.)
It really helps to have a second bucket. If you have a second bucket, here are the steps to doing a complete water change:
1) Place about 1 gallon of salt water in the clean bucket and set aside.
2) Siphon the old water through a sieve and into another bucket or container. (Oh yeah, you need a 3rd bucket, but it doesn’t have to be clean.) Try not to stir the old water up while doing this because the bottom of the bucket is going to be nasty. If you accidentally disturb the bottom of the bucket, wait until the water settles before continuing (about 30 minutes).
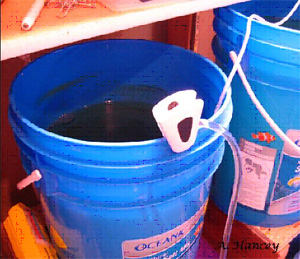
Figure 2: Water from the old bucket is going
through several sieves**. The old water, in this case, is
collected in a dish pan purchased from the dollar store.
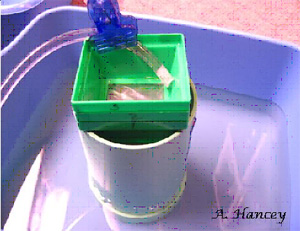
Figure 3: A syphon hose is coming from the old bucket.
**I use several sieves while siphoning out my pods and they range from largest to smallest in mesh size. It is not necessary to do this, but here’s how my sieves are laid out. I’ve numbered the green sieves (I purchased mine from BrineShrimpDirect.com ) as 1, 2 and 3 – 3 being the largest micron size, 1 being the smallest. The #3 sieve (560 microns) will collect any junk that is in the water that is larger than the pods themselves (including adult brine shrimp if you are raising them). The #2 sieve (300 microns) will collect adult copepods. The #1 sieve collects baby copepods and the big light green sieve that is in the picture is a 53 micron sieve that collects rotifers. ( 53-micron sieve )
Refer to Appendix A for a more detailed explanation of sieve sizes.
3) Flip the siphon with the rotifers/pods in it upside-down over the new clean bucket that you set up in #1 and rinse the sieve with fresh saltwater.
4) Add new phytopaste, stir it up a little to blend in the phyto and put the airline back in and you are done.

Figure 4: Pouring water over the back of the
sieve to get pods in to the new bucket.
5) Add new phyto paste, stir it up a little to blend in the phyto and put the airline back in and you are done.
If you don’t have an extra bucket to work with, follow these steps:
1) Get a small bowl that the sieves can easily fit in, and fill the bowl with new saltwater. Set aside.
2) Move your bucket to a location that is above the drain where you normally dispose of saltwater.
3) Let the bucket settle for at least 30 minutes.
4) Siphon the rotifers/pods through a sieve and out the drain, as done in the previous section.
5) Place your sieve into the shallow bowl you set aside in step 1 to ensure that they remain under water while you clean the bucket.
6) Clean your bucket thoroughly
7) Add 1 gallon of fresh salt water
8) Flip the siphon with the rotifers/pods in it upside-down over the clean bucket and rinse the sieve with fresh saltwater.
9) Add new phytopaste, stir it up a little to blend in the phyto and put the airline back in and you are done.
Harvesting
Getting copepods out of the container is about as simple as it gets. Take the appropriate sieve (usually 180 microns) and swipe it through the bucket and along the edges a couple times. Then rinse the pods with clean saltwater by holding the sieve over the bucket and pouring the clean water through the sieve. To add them to your tank, turn the sieve upside down over your tank and pour clean saltwater onto the back of the sieve. In order to avoid any cross contamination between your aquarium and the pods, never dip the sieve into your aquarium after it has been in the culture bucket. Once you have a healthy, strong culture of copepods growing, you should be able to harvest copepods at least every other day.
Rotifers are not as easy to harvest unless you make a small sieve to swipe through the bucket. I take a clean quart-sized container or larger and fill it up with the rotifer water. Then hold a sieve over the rotifer bucket and pour the water through the sieve and back into the bucket. Rinse the rotifers that are in the sieve with clean salt water before putting them into your tank. I usually just rinse them over the bucket so I am adding new saltwater to my bucket at the same time. I will add them to my tank the same way I added the pods, by turning the sieve upside down and pouring clean salt water onto the back of the sieve - avoiding any cross contamination between my aquarium and the rotifers.
Please refer to Appendix B for important notes on enriching rotifers.
Things You May Have Noticed Are Missing
-
a heater– room temperature is good. If rotifers are growing too slow, you can add a heater and set it to 75-80F and they will multiply faster. If you keep the heater on, however, you will need to make sure that you do daily harvesting because they can multiply so quickly that they will crash. Copepods like the cold. My copepod culture can get down to 58-60F in the winter and up to 65F in the summer. (I keep them in the basement on a concrete floor.)
-
glass– I tried growing rotifers for several years in 10-gallon tank and they kept crashing. Since I have moved to a plastic bucket several years ago, I have not had a rotifer or copepod crash.
-
Overhead Lighting – These critters hide when they are in our aquariums, and they come out at night. I have had more success since I dimmed the lights on them.
It is never a bad idea to have a backup culture. That way if you lose your main culture, you can start the culture over again with the backup pods/rotifers. I always have a 1-gallon bucket running with rotifers and copepods in them. (I just grow them together in this bucket.)
Pictured below is my one gallon white bucket that I use as a backup. They grow very slow, which is what I want. I end up changing the water about every 3 months. I know, it’s crazy…but it works.
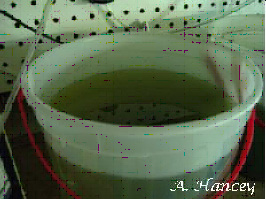
Figure 5: 1-gallon backup culture
Thanks for reading. Please contact me with questions at Email Me .
Appendix A
There are a lot of different sieve sizes and they can be used for so many different purposes. That is why it is always hard for me to give a straight answer to anyone when they ask, ” What sieve do you use?” Sieves sizes are measured in microns so you have to know what micron size the pods are that you are working with in order to know what sieve size you need. So what is a micron? It is a metric measurement that is .0001 of a centimeter. To give you an idea of size, a typical hair from your head is 100 microns.
First let me give you the basic sizes of the different ‘bugs’ you may be working with. Then you will need a sieve that is smaller than the size of what you are trying to catch.
| Live Food | Size in Microns | Sieve Size Needed |
|---|---|---|
| rotifers | 100-300 | 53-70 |
| Tigger-PodsTM | 250-500 | 180-300 180 catches babies, 300 catches adults) |
| Utah Brine Shrimp Nauplii | 250-350 | 180 |
| San Francisco Brine Shrimp Nauplii* | 150 | 53-100 |
*If you are raising San Francisco Brine Shrimp vs. Salt Lake Brine Shrimp, a smaller sieve size should be used.
BrineShrimpDirect.com has a combination of 4 sieves that I use constantly. The sieve sizes in this package are 180-microns, 300-microns, 560-microns, and 900-microns. ( Sieve Combo Set ) I label the sieves with a magic marker ‘1’, ‘2’, ‘3’ and ‘4’ with ‘1’ being the smallest sieve size and ‘4’ being the largest. Then when I pour the water through, I’ll stack these on top of each other with ‘1 ’ being on the bottom of the stack. If you are growing anything else in with your copepods, then this method will help filter the other creatures out. Filter ‘4’ will catch adult brine shrimp, Filter ‘3 ’ will catch juvenile brine shrimp, Filter ‘2’ will contain the adult pods and smaller brine shrimp and Filter ‘1’, will catch the baby pods and nauplii brine shrimp.
If you take this one step further and purchase a 53 micron sieve, then you can put this sieve on the bottom of the stack to catch rotifers and small baby copepods. (Brineshrimpdirect.com carries the 53 micron sieve as well.)
If you want to make your own sieve it can easily be done, especially for copepods since they are so big. Use any fabric with a tight weave. Many have used a coffee filter, or go to the fabric store and buy tulle’ (similar to bridal veil but with very small holes). You can take the fabric and superglue or silicone* the fabric to the edges of a segment of 3” PVC pipe and you just made your own sieve for under $5.
You can also search the web and find micro mesh available and get the exact micron size that you need.. It can be pricey, but if you are in this hobby for a long time, it might be worth it.
*Use only silicone approved for aquarium use.
Appendix B
Important Notes about Rotifers
An entire article could be written about enrichments. But it needs to be noted that rotifers are only as nutritious as their last meal. And if you are following this article’s method of raising them, their last meal is Nannochloropsis phytopaste – which is not high in HUFAs or Highly Unsaturated Fatty Acids. If you are raising clownfish, HUFAs are essential for their growth so the rotifers must be enriched before they are fed to the clownfish.
There are so many different ways to enrich rotifers and since this is an extensive subject, I am not going address it here. I would suggest that you do some research on the internet or read The Clownfish Book by Marianne Wilkerson to learn about the different methods for enriching. One method that I use is Selco .
After you filter rotifers out of the bucket, it is important that you keep the sieve underwater as much as possible. If exposed to the air for too long, the rotifers will ingest air and then when you put them in a tank or another bucket, they will float. I’m not sure if it kills them or not, but they are no longer available to the larvae. Someone told me this and I didn’t believe them until I saw it for myself. Now I’m more careful. I will get a small bowl and put fresh saltwater in it and place the sieve, with the rotifers, in the bowl until I am ready to put them in the tank or another bucket.
Before adding rotifers, or any live food for that matter, into a tank you need to rinse them off with fresh salt water. Just pour the fresh salt water into the sieve while over a bucket or sink.